2020 Desktop Upgrade: Complete! Well, Mostly.

Alright, we’re packing it up. It’s done. Well, mostly.

That’s a lot of screen real estate…

That’s a lot of screen real estate…

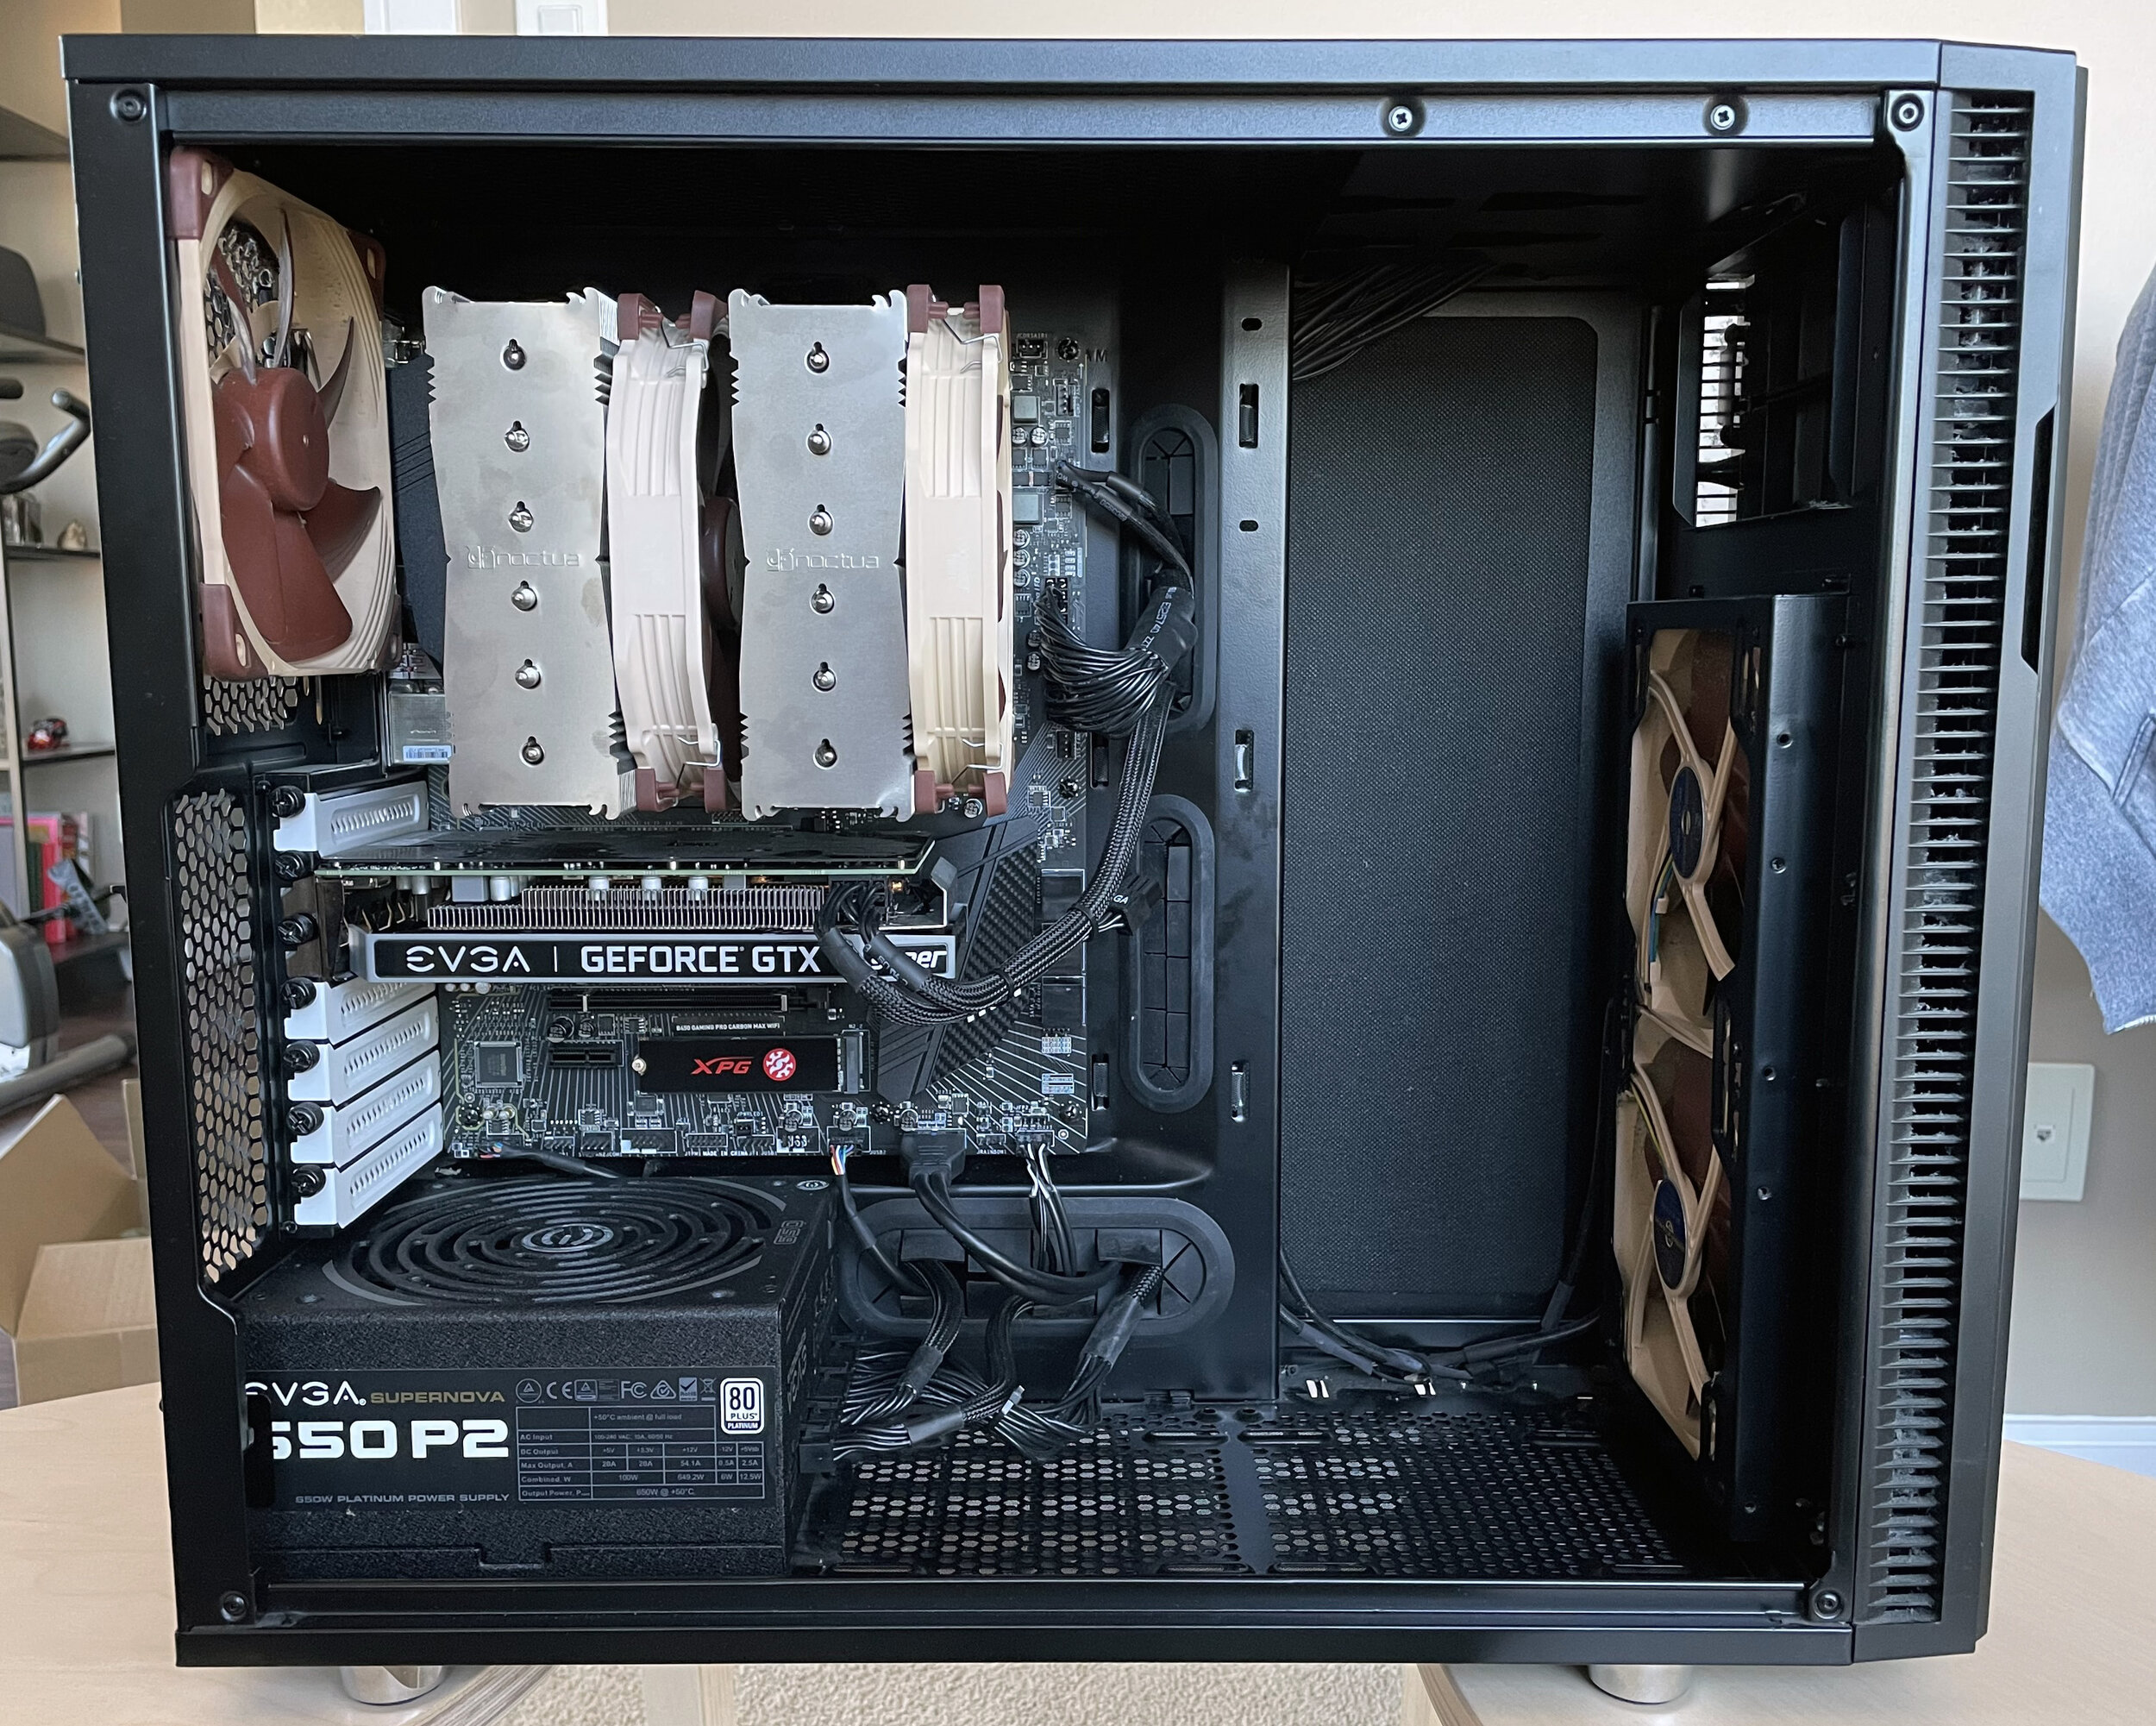
Final spec as per below:

  • AMD Ryzen 9 3900X w/ Noctua NH-D15

  • 64GB Corsair Vengeance LPX 3200Mhz DDR4 RAM

  • MSI MPG B550 Gaming Carbon WiFi motherboard

  • ADATA XPG SX8200 Pro 2TB NVMe SSD x2

  • Western Digital Blue 4TB SATA SSD

  • Zotac AMP Holo RTX 3080

So yes, we swapped the B450 board for the B550 variant. It was a few dollars more, and I didn’t realize when buying it I wasn’t getting full speed out of my NVMe drives. With both slots now supporting at least PCIe 3.0, I’m getting within spec reads and writes on the second drive. There’s some other nice stuff like support for front panel USB-C, the option to turn off RGB directly on the board, and full access to the SATA ports even with NVMe drives connected. It should better support Zen 3 if I do decide to move over to that.

More brown and beige.

More brown and beige.

I’ve also gone ahead and added a few additional Noctua NF-A14 PWMs as bottom intakes, and managed to get a nice sized finished piece of MDF for the tower to sit on top of. This also let me re-invert the power supply to feed it cool air from the bottom. The 3080 is a very hot card and the more cool air I can provide to it the better. All fans run at 35% (About 500-550 RPM). When system temp jumps up past 40 degrees, the case fans will ramp up to 80% at 50 degrees with a .7 second ramp up time and 1 second ramp down time. 100% is at 60 degrees, which I think is pretty unlikely to be hit. This ensures the system is fed plenty of cool air when it’s under load, but otherwise maintains my desire for silence. It’s not as quiet as it was, but the TDP is definitely higher so that’s understandable.

I ran out of black zip ties so here we are with clear ones… Oh well, closed case.

I ran out of black zip ties so here we are with clear ones… Oh well, closed case.

The processor is a different story. Since single core loading can ramp up die temperature very quickly, I have the fan set to run constantly at 35% until it hits 65 degrees. It then will ramp up to 80% @ 75 degrees and 100% at 85 degrees. This keeps the noise level down when doing day-to-day things like browsing and videos and whatnot, while still ramping up when required. 65 degrees is not uncommon to see in quick bursts, but I really don’t want to hear the whir of the fan right away when I know the thermal mass of the D15 can take care of most of the heat.
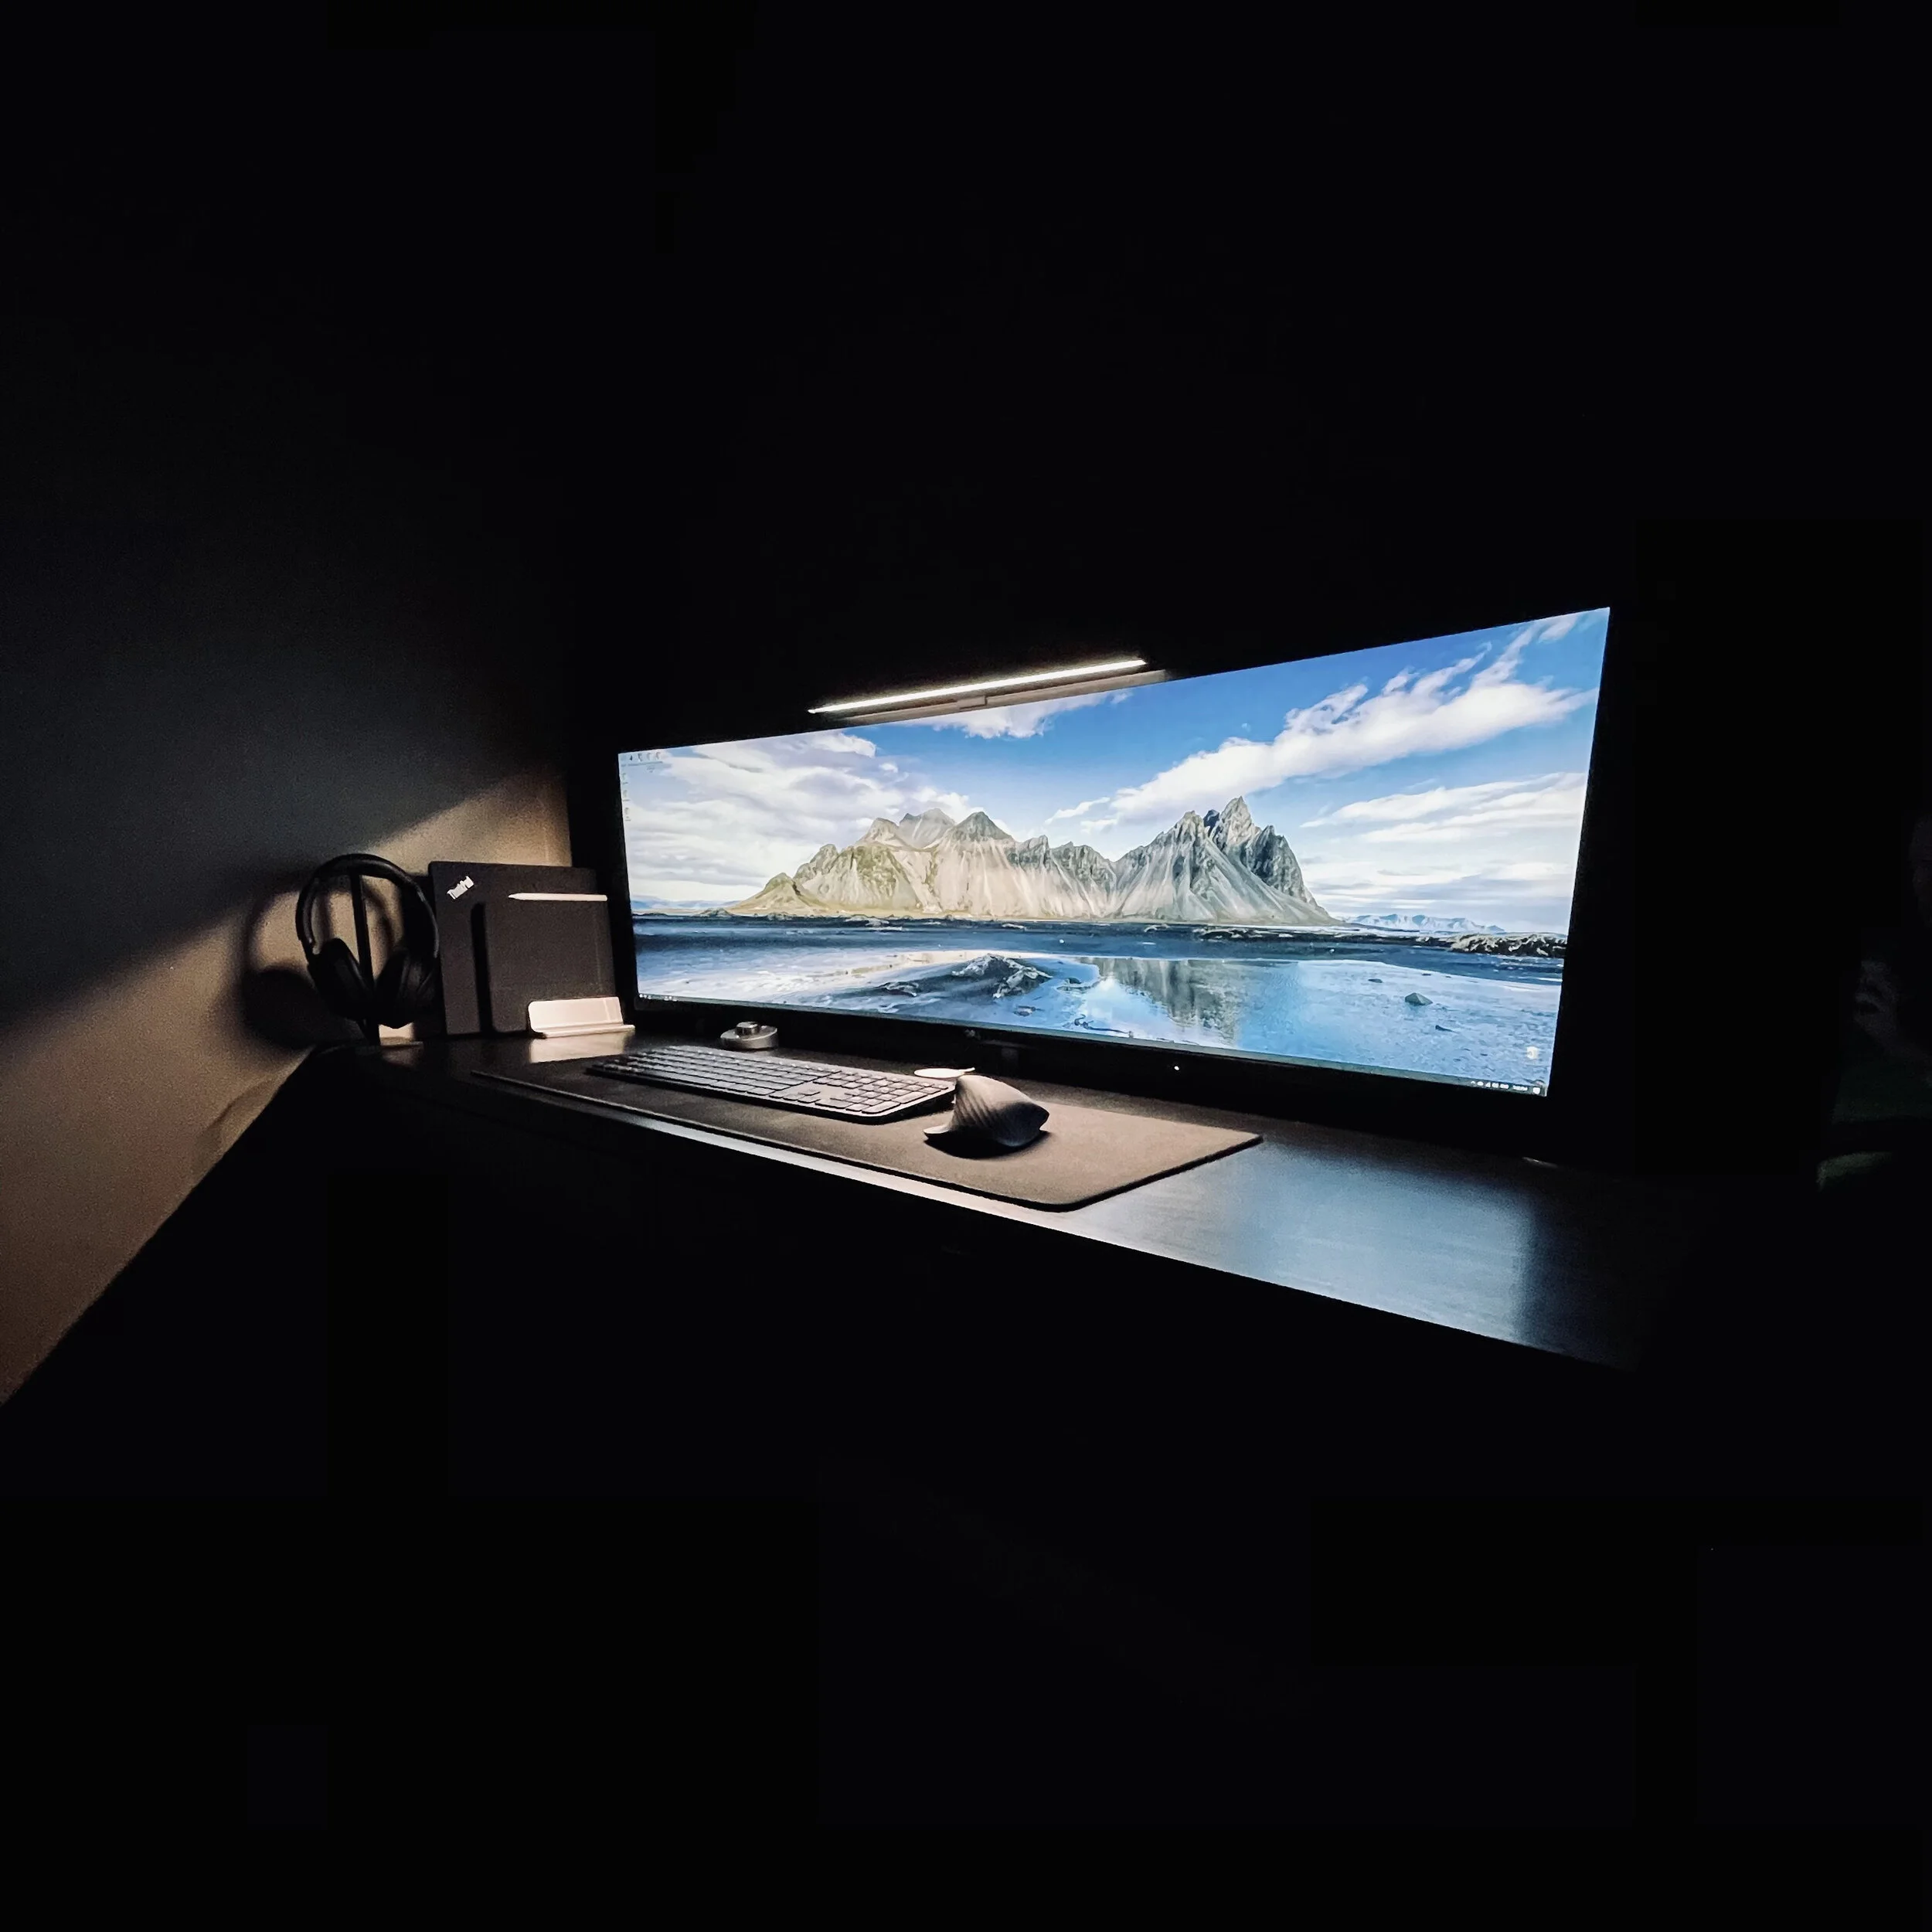
Wide boi.

Wide boi.

The U4919DW is absolutely massive. The size of the box alone is extremely large. From a real estate perspective it’s like having 2 27” 2560x1440 displays side by side, without the bezel in the middle. And yes, I could have had 2 4K displays for a bit cheaper, but this resolution will be easier to drive for games. A single mount is fairly attractive, and even after playing a few hours of games I can see how this is much more immersive than a single 4K display would be. The work laptop gets a single USB-C cable connected to it, which drives video and power. The desktop gets connected to Displayport. Mounting the display was a bit of a challenge, as I needed to purchase 40mm long M4 screws and nylon spacers to get it far enough off the wall to use my ScreenBar.

ScreenBar Plus - Pricey light, highly functional.

ScreenBar Plus - Pricey light, highly functional.

Finally, we have the ScreenBar Plus from BenQ. Out of focus in the background you’ll also notice the control knob. I keep it on auto most of the time, however there’s full control of the warmth and brightness from the knob. I gotta say, having a task light makes things considerably easier during the darker winter months.

So that’s about it other than a few small things. I have maybe 2-3 more small things to look at before calling it complete, but it’s highly functional as of now.

  • Longer USB-C cable for connecting the laptop - Included one is fairly short and makes powering on the laptop a bit of a pain.

  • Better routing for headphone cable - Considering an extender run from the back, anchored at the bottom of the desk between the two drawers.

  • Better WiFi antennas for the WiFi on the motherboard - Connectivity seems fine, but it could be better. There’s some options out there with a magnetic base that seem great.

  • Shelving above the monitor - I have a shelf I like for this but pandemic means no access to a hammer drill. Will wait on that for now.

  • Cable routing - This could be improved with a larger cable channel.

  • Bias lighting on the monitor - Researching solutions here. I really just need the light to be on when the monitor is on, so I may just go with a fairly cheap USB powered warm light strip and see what it’s like. The ports go unpowered when the monitor goes to sleep, so it should technically only be on when the computer is in use.

  • Speakers - This may just be a Bose Solo 5 mounted above the monitor. If we upgrade the living room TV we’re likely to replace the Solo 5 with something a bit beefier, so I can just take that.

  • Maybe better positioning for the magsafe charger? It’s fine for now.

Not bad, but definitely things for the new year. For now, I’m waiting on CyberPunk!

2020 Desktop Upgrade: Continued Again

It’s all over except some more cable management… And a whole lot of tweaking.

Absolute unit.

Absolute unit.

I know they said the 3080 was a big card, especially the AIB models, but wow, this Amp Holo takes it to another level. This thing weighs a ton! Overall it’s a fairly attractive looking card. The solid backplate lends itself to a slightly lower thermal performance than other AIBs, but I’m that’s mostly down to the stock fan curve which is fairly quiet.

Current curve.

Current curve.

The RTX 3080 takes very well to “undervolting” and can tend to maintain great clock speeds at much lower voltages. I’ve decided to do a stepped curve as per what I’ve found on Hardforums, and then set my power limit to 90%. With this I’m pulling about 300w vs 350 at stock, performing about the same as stock, and producing less heat.

The current fan curve.

The current fan curve.

My current fan curve is fairly aggressive. In my current testing, playing older titles (Mass Effect Andromeda, Borderland: The Pre-Sequel) I’m seeing temps under 60 degrees, and for more demanding titles (My only RTX title currently is Call of Duty Modern Warfare) see 4K gameplay at max settings hit 71c max. Oh, and that’s pinned at 60FPS. Not bad! Noise isn’t a massive concern as I play games with headphones, and otherwise while doing normal tasks the system is close to quiet - I definitely have fan speeds up a bit more than previously, but we’re looking at much higher TDP parts now.

1660 Super for context.

1660 Super for context.

I feel like I can go lower on voltages with a bit more testing, but I really just want to play some games again. I’m pretty happy with the settings as is, and with a bit more time playing with ideal fan curves for the case, I think I can bring my temps down a bit further. This cannot be treated like the previous cards where I can keep my case fans at around 300-600RPM. I have some plans to raise the case off the carpeted floor using a plank or something but I haven’t got around to it yet. With that, an additional 140mm intake or two at the bottom could add more airflow to a very hot card and ideally let me drop fan speed a bit more. I’d also be able to flip the power supply again, isolating it from the rest of the system. Sometime in the near future I suppose.

That’s a lot of NAND.

That’s a lot of NAND.

Finally, taking the place of my 6TB external drive is this 4TB Western Digital Blue SSD. It’s a TLC drive that can saturate SATA3, which makes it considerably faster than the 160mbps I was getting off the external. The big two boosts here though come from both the lack of noise and the responsiveness of an SSD. The external was loud and slow. It’s fine for dealing with movies and stuff, but my Lightroom Classic library is on the drive, and that makes a huge difference. Just firing that up after migrating my data was astounding the difference in performance. NAND only baby, here we go.

So I suppose that’s almost it for desktop upgrade. It’s been a while, and I hope it’ll be another while before we do it again. I’ll be posting more photos once the U4919DW arrives, and on top of that, expect photos once I’ve re-cabled the desktop.

2020 Desktop Upgrade: Continued

Alright, initial build complete and man this thing is quick! Couple things to note about the process.

Still some work on cable management to be done… That can wait a week as I’ll be adding more cables.

Still some work on cable management to be done… That can wait a week as I’ll be adding more cables.

  • The D15 is tight, even in a nice spacious case like the Define R5.

  • Memory was all detected perfectly and running at XMP profile after a bit of tinkering with placement on the board (had to start with 2 sticks in slots 3 and 4, then add the rest).

  • It doesn’t seem I can disable the RGB lights on the MSI motherboard through the BIOS, but that’s minor in a windowless case.

  • The thermals on the 3900X are real! I currently idle high 30s low 40s and seem to top out at about 73 degrees under Prime95 Small FFTs. Single core load seems to spike temps more, but still manageable. The 3900X runs hot due to the density of the chip, and under regular load I should never see any issues.

  • I finally got a decent fan curve where all fans in case operate at about 500RPM until the processor hits 65c, then they’ll ramp up to 100% at 85c. There’s a delay in ramp up and ramp down too, which smooths things out a bit.

  • NVMe SSDs are definitely faster than the SATA I had in there before. Windows install took no time and I’m having no problems with system responsiveness.

With that said, initial thoughts are this thing is going to be fine for 5 years. If a sale comes up in the next year for a 5900X or 5950X, I might switch over to that, but that’s only if I can come across one for about the same price I paid for the 3900X.

Oh yeah, that’s a winner. Not sure why I like that beige and brown color scheme.

Oh yeah, that’s a winner. Not sure why I like that beige and brown color scheme.

As for further upgrades, I’ve got 2 coming in:

4TB Western Digital Blue SATA SSD: This one seems a bit weird since I just grabbed 2 2TB NVMe drives and mentioned how much faster they are. I do however have a 6TB Seagate external hard drive that’s quickly become the loudest thing at my desk… And well, we just can’t have that. I use large format storage to hold my Lightroom Classic library and other various software and media, so having a 4TB SSD in place of an external spinning disk will improve Lightroom Classic responsiveness 10-fold. This is useful for working and managing older images that I don’t store on creative cloud. This should also be useful as a working drive for some low-use VMs that I may want to run. As of now though, it’s primary purpose is storage! I can’t complain about the price either, as Newegg had a special running the day I was looking. 35% off made for an all time low for 4TB SSDs.

Zotac RTX 3080 AMP Holo: I caved. Also I managed to FIND one out of sheer luck. Best Buy had listed a SKU recently that wasn’t being tracked by any of the bots or scalpers, and I managed to get an order through on it. This will be my first higher end GPU, as I usually come in around the xx6x/xx7x series historically (8800GT, GTX 260 Core 216/GTX 275, GTX470, GTX 670, GTX 970, 1660 Super, etc). I haven’t been playing too many games lately, but that doesn’t mean I don’t want to, and with the global pandemic, it’s even easier to find time to do so. With the U4919DW clocking in at 5120x1440, the 1660 Super really wasn’t going to cut it. After seeing benchmarks on the 3080 and seeing it smashed just about any title on the market at 4K with 60+ FPS, I was convinced to go up a tier this time around.

I’ve inverted the power supply as it’s sitting on carpet now, but checking inside the thing was clean  - I’m not sure the fan has even come on since I bought this unit. Would have liked it if this motherboard came with a second NVMe heatsink.

I’ve inverted the power supply as it’s sitting on carpet now, but checking inside the thing was clean - I’m not sure the fan has even come on since I bought this unit. Would have liked it if this motherboard came with a second NVMe heatsink.

The Holo doesn’t appear to have many reviews, and the little there is on the internet seem to indicate it isn’t the quietest/coolest card out there, but my plans are to under-volt a bit anyway. This should also help assuage my fears of my 650W PSU being too little. Everything I’ve read online says I should be fine with the 650W, but Nvidia’s recommendation of a 750w has me a bit worried. I feel the EVGA P2 650w should be super solid though being based on the Super Flower Leadex platform, and worst case scenario I grab something a bit beefier and sell this premium unit to make up for the cost.

2020 Desktop Upgrade

It’s that time again. And what a time it is. If anyone reads this blog they probably know the last time I had upgraded my computer is coming up on 5 years ago, and my component choices were solid for the time. My needs have changed a bit though with a lot more focus on creativity and less focus on gaming. That being said, for 2020, my current i5-4690k and 16GB of RAM really aren’t feeling as quick as they once were. Having Lightroom and Photoshop open at the same time with a few chrome tabs in the background pretty much means we’re paging a bunch of data to storage, and although my SATA SSDs are SSDs, they’re not as fast as NVME is now. So going into this, the parts list:

  • AMD Ryzen 9 3900X

  • MSI B450 Gaming Pro Carbon MAX WiFi

  • 64GB Corsair Vengeance LPX 3200mhz DDR4

  • ADATA XPG SX8200 Pro 2TB NVMe SSD x2

  • Noctua NH-D15

I’ll be keeping my case, power supply, and fans, but WOW, that’s a build list right there. How about my choices?

AMD Ryzen 9 3900X: AMD for the longest while was the underdog, but with Zen 2 AMD started becoming considerably more competitive. Compared to Intel, Intel still leads in the single core performance game, but for the margin is extremely close. When you look at multi core, there’s no competition at the price point – 12 cores and 24 threads is an extreme amount of processing grunt. With my workloads tending to be fairly multithreaded, this should be a huge benefit over the lesser core count Intel offers. From a games perspective, the new game consoles are built around AMD’s Zen 3 architecture, being 8 core 16 thread APUs. Going with a higher core count should ensure that a lot of future game titles run better on my PC as practically every platform is coded similarly now – Windows, PS5, Xbox Series X/S. This may in the future be upgraded to a 3950X, or perhaps a Zen 3 equivalent – Zen 3 providing around a 20% IPC boost over Zen 2.

MSI B450 Gaming Pro Carbon MAX WiFi: Full ATX board, minimal RGB, lots of fan headers, 2 NVME slots, premium audio codec (ALC1220), Intel WiFi (1.73ghz max) and Bluetooth 5.0. B450 is slated to receive a BIOS upgrade in the new year to enable support for the Zen 3 chips, so slotting in a Zen 3 chip in the future is easy. Yes there’s no USB4, and it’s missing out on PCIe 4.0, but these are features that aren’t really relevant to me currently, nor do I see them as being relevant in the next 5 years considering my reliance on cloud file transfers for the majority of file sharing. WiFi is a huge requirement as we’ve moved to pretty much exclusively wireless connectivity in the apartment, so the best WiFi chipsets are definitely required.

64GB Crucial LPX 3200mhz DDR4: Well, the board needed DDR4, the heat sink requires low profile memory, and I really didn’t want to get stuck at 16GB. 4x the memory will give me plenty of room to play with photoshop and Lightroom simultaneously, spin up VMs, and forget about Chrome tabs being open. 3200mhz should be a fine spot for my requirements.

ADATA XPG SX8200 Pro 2TB NVME SSDs: 3500mbps reads, 3000mbps writes, why not? These things are blazing fast and should work great for my needs. I don’t plan on RAIDing them. If 1.25TB of SSD storage got me through fine for 5 years, I think 4TB should be plenty for the foreseeable future.

Noctua NH-D15: I’ve been a Noctua guy forever. I love the quirky color scheme, and the fans just plain sound great even at full speed. My NH-U12P has been with me since 2008, and although it’s likely up for the task, I want to go with something potentially even quieter for the beast that is the 3900X. Here’s hoping I can keep my 300rpm fan speed for the foreseeable future with one of the giants (both in size and performance) of air cooling.

For all that, the build was surprisingly less than I was expecting. I’ll be carrying over my exceptional EVGA 650W platinum power supply, my case, and my fans. I’m still waffling on the video card – I don’t really play as many games as I did before, but I’d really like to try changing that. On top of that too, I managed to score a Dell U4919DW for extremely cheap. A 49” super ultra wide monitor with a resolution of 5120x1440 might be a bit rough to push with a 1660 Super. Even scaling resolution back to 3840x1080 for games is a lot more pixels than my existing 2560x1440. The RTX 3080 has been tempting, and I have a pretty good feeling that could be a 4-5 year video card… Provided I can find one. The U4919DW will get a lot more use for productivity however, considering how much we’ve been working from home, having it connected for work will be like having 2 of my current monitor setup again.

Perspective: A Week In The Walled Garden.

I’ve been a lifelong Android user. I’ve owned a few Nexus devices, I’ve owned a OnePlus, and recently I’ve been on the Pixel train. I’ve never owned or used an iPhone extensively. Until this past week.

Borrowed iPhone XR and owned iPad Pro 2020.

Borrowed iPhone XR and owned iPad Pro 2020.

I’ve been pretty happy with my Surface Pro for a while. After finding out the iPad mini wasn’t really cutting it for me at the time, I bought into the Surface for some travel purposes. It fatefully showed me through a few multi-week trips, and even became my primary computer for my past few moves. For that it did pretty great. That said the 8GB of RAM and 128GB of slow-ish SSD storage made me look at upgrading casually over the past few months. If I can get the majority of my day-to-day done on a low power machine while keeping the desktop off, why not, after all? But the Surface Pro 7 was expensive in the configuration I wanted, so I threw most of my upgrade ideas aside.

Until a few weeks ago when I was able to demo an entry level 7th generation iPad. Loading up Lightroom I fell in love again! The thing absolutely flew through edits. I shared an album of photos of my partner with her, she liked/commented on the ones she wanted to keep, and I edited them on the fly as she did. Never a hitch, never a slowdown. Couple this with a lot of the changes in iOS since version 11 on the Mini and I legitimately could replace my Surface with an iPad.

So I bought a 256GB 11” iPad Pro 2020 model. Free AirPods (Not keeping them, I’m quite fond of my Sony setup), grabbed the pencil, good to go. This FINALLY feels like a tablet that just gets out of the way and lets you do the stuff you need to do. There’s no lag. Scrolling is completely smooth. Multitasking is basic but fluid. The screen is gorgeous. The pencil actually feels like it’s a natural writing experience. No lag waiting for strokes to show up on screen. No trailing. Just feels good. Keyboard and mouse support is awesome! I’m typing this now at the dining room table with my MX Keys attached to it. Lightroom direct import is basically what it was missing! The photo in this post was imported directly into Lightroom with a USB-C SD card reader, edited, and uploaded.

I was convinced enough by iOS 14 to try an iPhone too, so I borrowed an XR. This wouldn’t be my first choice in device, but it was a pretty good option to see what the walled garden had in store. And it really does just work. With iOS 14 changes I’m able to set default mail and browser clients, and use some basic widgets. The past week with the XR makes me realize that I’m a Google user, not an Android user.

I suppose we should have a pros and cons though…

Pros

  • Tight app ecosystem - The quality of apps on tablets and phones feels higher.

  • Exceptional battery life - I could never get 2 days out of an Android device. With similar usage, I’m seeing 2 days with the XR pretty easy. The standby is great.

  • IOS 14 brings app drawer, default client selection, and widget support! Finally.

  • All of my favorite Google apps are available on iOS, and in some cases seem to run better?

  • Parity features. Apple Pay works great on the phone. FaceID is as good or better than the Pixel 4.

  • Great tablet system, and a smart watch that actually looks worthwhile.

CONS

  • No USB-C on the iPhone, still. C’mon Apple. I’ve been working so hard to go one-cable.

  • Control of audio settings leaves a bit to be desired, but is workable.

  • AAC is the highest Bluetooth codec for audio, but not overly noticeable.

I guess my cons list is pretty minimal. I’m excited to see what the next iPhone release looks like. I haven’t had a new phone for myself in about 2 years, and that seems to be my current upgrade cycle. I wouldn’t mind giving it a change. Whether that’s a 12 Mini, or an 11 Pro, time will tell.

Wireless Hunt: Bad Romance Edition – 2020 Pixel Buds

So much promise, but unfortunately, I’m going to be returning them. I was really hopeful for these when they were announced in 2019, but they just don’t live up to what they should be. They’re compact and lovely, but plagued with connectivity issues that shouldn’t have been a thing when they shipped. There was a promised update to address this, but the update came and went in August, and the problems persisted.

FUJI0873.jpg

Pros:

  • Case size – This is TINY! It fits into most of my coin pockets, and the buds sit well in the ears.

  • Fit – They fit great, after a 2-3 day adjustment period I could wear these things for hours.

  • Integration – They integrate very well with the Pixel device, from fast pairing to the app function. They just seemed to work in that sense.

  • Build quality – The case is addictively clicky and the buds feel well built but incredibly light.

  • Features – The new feature drop for August rolled out some super cool stuff like detection for sirens/barking dogs, detection for when you’re sharing buds to allow individual volume control, and a bass boost that’s subtle and well implemented. Let’s not forget automatic volume based on ambient sound and wireless charging in the case too.

Cons:

  • Connectivity - If anything is annoying with true wireless ear buds it’s connectivity problems, and these things cannot actively maintain a connection in some way, shape, or form. It’s either connectivity to the phone, or a split second skip every 1 minute 50 seconds when using two buds. It really does feel like this is a beta product on the connectivity front.

  • Sound quality – This isn’t up to par with my WF-1000XM3s. The sound quality would be good for some, but for me, it wasn’t $240 good.

  • Case is only in white - Although the buds have released in additional bud colors, the case is only in white. Minor con, but I would have loved a black case to match black buds if I had the option.

So there you have it. A pretty photo and a not-so-pretty pros and cons list. They have a lot of pros, but the connectivity con really outweighs everything. I may revisit these in the future, but for now, they’ll be going back.

Bags are cool - Peak Design 3L Update

This thing can fit a lot of stuff!

FUJI0387.jpg

My current load out is as per below:

That’s a LOT of gear, and just about everything I could ever need for a daily outing, and then some.

The JJC Filter Adapter+Hood was chosen over the official Fuji because it’s 1/5 the cost and still made of metal. I went with the best class of B+W filters I could as if you’re going to put glass in front of glass, it may as well be the best it can be. My charging gear is of course Anker, and it’s gotta be power delivery capable. All my personal devices carried charge or connect via USB-C. The USB-A cable is only brought in case I’m out with Sam and she needs to charge something. Everything else is a possible daily need - Advil tube carries things for allergies, indigestion, and aches/pains, sun block is a necessity for the summer in Canada, and the hand sanitizer and cloth mask are a bit of a necessity for pandemic times.

If I need more than this, I have my 20L Everyday backpack. I’ve got plans to see exactly what I can fit in there, but I’m pretty confident with a single bag and my gear setup I could make it into a weekend bag, even with my Surface Pro.

WCL-X100/TCL-X100 Mod - Save Money, Get That V2 Experience

If you still have your original v1 converters kicking around, about 2 dollars worth of supplies and a bit of patience can get you a v2. It just doesn’t look pretty - But hey, who looks at the back of these things?

Magnets. How DO they work?

Magnets. How DO they work?

Optically, the V1 and V2 converters are identical. The V2 was introduced with the X100F and introduced auto-switching. Magical! It must be some form of electronics! Actually it’s just a magnet.

The lens detection on the X100F and X100V is triggered by a magnetic field placed on the lens at approximately the position shown below.

Just magnets.

Just magnets.

Polarity wise, one polarity triggers the telephoto conversion, and the other triggers the wide angle.

So, with a bit of deal hunting for v1 versions of these lenses, an Amazon order, a dollar store trip, and a bit of trial and error, I was able to convert my V1 lenses into what is functionally V2 versions. I bought some 4mm wide by 2mm tall magnets and some 5 minute epoxy. I had tape on hand and tested placement first with that. My total costs? It was about $250 Canadian for each of the conversion lenses, $0.25 worth of magnets, and the tube of epoxy was $1.50. If I was to buy the v2 lenses, they would go for about $450 Canadian each, plus taxes. Over $500 in savings for buying the V1 and doing the mod.

With my magnets, I required 2 on each lens stacked - So if you can come across a 4mm x 4mm magnet, you’re probably fine too. With better magnets, you can even get by with a 2mm x 1mm magnet on the ledge below the threads, as I found online. I’m fine with an uglier presentation as it’s functional, does not impede performance, and doesn’t affect the look of the camera.

Bags are cool.

I got a new bag. Surprise!

FUJI0387.jpg


3L Peak Design Sling V2.

Initial thoughts:

  • Holds the X100V, a couple batteries, and daily essentials like a battery pack and headphones.

  • All black is unassuming and wears well, though I do wish it came in charcoal.

  • I miss the Hypalon zip loops.

  • Double pull vs single pull zipper is great.

I’m happy with it so far. I’ll be seeing how much actually fits inside the thing with an EF-X20 and the two Fuji conversion lenses in, but I fully intend this to be my day bag for trips downtown or out when travelling. With how little I use my work laptop, this may actually become my daily work bag too once work opens back up.

I’m still working on a better travel system than my 20L Everyday backpack + 35L no name duffel, and the 3L + the Peak Design travel backpack seems like it might fit the bill, if I can find the backpack on sale.

Wireless Hunt: My Demons Are Chasing Me - Sony WF-1000XM3

I tried the WF-1000X earlier this year.  They live in my desk now, unused. Good sound signature and isolation wasn’t worth the connectivity and battery issues that plagued a very first-generation product. I lived happily for a few more months with the Pixel Buds, until Sony announced the WF-1000XM3. Better connectivity, better battery, better everything. They dropped out of my mind due to supply issues in Canada and just how easy my Pixel Buds were to use.

In October, Google announced the Pixel Buds 2. They look great. I have two issues though, the first being the lack of active noise cancelling, and the second being the Spring 2020 release date. So here we are in January with the WF-1000XM3.

Sony’s WF-1000XM3 with Spinfit CP100 Large.

Sony’s WF-1000XM3 with Spinfit CP100 Large.

The WF-1000XM3 are a true-wireless IEM with a 6+ hour battery life, 18 hours in the case, and capacitive touch controls on each individual bud. They feature industry leading active noise cancelling with “ambient aware” audio passthrough and adaptive sound control.

Initial impressions were great. The packaging was clean and easy. They look pretty good too. I would have preferred a fully blacked out case and a blue LED for charging indication, but I’ll give Sony a pass with the copper colored plastic accents. Pairing was simple with NFC in the case. The controls were simplistic, but usable. I would like to see some swipe controls like with the Pixel Buds for volume control, but touch controls have never really been a great Sony feature. I kept it with the default anyway, with the left bud controlling the noise cancelling features (Single taps to cycle through noise cancelling options, long press for instant-aware ambient passthrough), and the right bud controlling playback (A series of taps to play/pause, next or previous). I thought I’d miss volume controls but being noise cancelling and rather well isolating, they’re often kept at one volume.

How about the sound quality? After spending days looking for tips that work with my dumb ears, I’d say great. For tips I tried in large:

  • Included and older Sony tips (Too small for a shallow fit)

  • Monster SuperTips in foam and silicone (Too large to properly fit in the case, but nice in the ears)

  • SpinFit CP100 and CP360 (Iffy fit on the CP100s, CP360 didn’t fit at all)

  • Spinfit CP100 with a cut up Comply foam inside (great option but the foams kept tearing)

  • Apple Dual Driver IEM tips with Comply foam inside (Same as above, but didn’t fit in the case)

  • Symbio W from MandrinE (The very best option. Perfect fit, great isolation)

So, after receiving the Symbio Ws, I’m happy. They’re what I was trying to do with my Spinfits filled with foam, but they’re a commercial product designed like that. They fit well in my ears, and they fit in the case. The foam layer adds additional isolation which improves the noise cancelling. All in I’d say they’re musical, if a bit on the dark side of things, but hey, I’m comparing that to Etymotics.

So, what’s good about them?

  • Sound quality and noise cancelling – Ideal for the city.

  • Battery life – 6 hours with noise cancelling on a single charge of the buds, with more in the case. Awesome.

  • Connectivity – Not perfect, but at this point I think it’s just poor Bluetooth in the Pixel devices. Very few connection issues.

  • USB-C charging – This is pretty much to be expected at this point.

WF-1000XM3 case left, Google Pixel Buds case right.

WF-1000XM3 case left, Google Pixel Buds case right.

The not so good?

  • The case is massive. Although not awful, it’s making me want to try the Pixel Buds when they release.

  • Touch controls could be better.

  • How about including some even larger silicone tips for us freaks with huge ear holes?

Overall though, these are high quality buds even at $300 CAD. I’ll be giving the Pixel Buds a try for the smaller case, but if the fit and isolation isn’t as good, I can’t see myself moving away from the Sony’s.

Stuff I Like - Every Day Carry

It’s been a while since I’ve done any posts on my everyday carry. It’s something that evolves and changes constantly for me, and as a subject in general I find it fascinating to see what others have in their pockets. As for mine, I think I may have started thinking about it more consciously about what I carried on myself and what I used daily about 6 years ago. It’s always been some permutation of keys, wallet, and phone, however.

DSC06308.jpg

Phone:

Pixel 4 128Gb with Google fabric case. Feels like the Pixel 3 so I didn’t review it. I’ve been using a case on my Pixels since mid 2019 as I really like how the fabric case feels. Fast, and approximates my camera when that’s not around me. I wish the battery life was better, but that’s all phones.

Wallet:

Popov card case in royal blue. This is a discontinued color. I’ve had this for 5 years and I love it, just like all my other Popov products. Very well built. I’m considering switching it out for a brown one, but it’s not necessary.

Watch:

Citizen BM8180 with a Timex slip-thru leather strap. I stopped wearing this for a while but recently revisited it. The leather strap breathes a bit of new life into it. I love the watch but would love it even more without the date window. It’s fiddly to adjust.

Keys:

My house keys are in a Quiet Carry “The Shorty” with stonewashed titanium finish. This one has the multitool on it. It’s relatively new to me but it’s very well built and fun to fiddle with. The multitool opens bottles and packages. I wish it had a deeper carry clip, but otherwise great.

Other stuff:

The handkerchief is new – It doesn’t take up a lot of space and can be useful occasionally. Time will tell if I keep carrying one.

The titanium pocket tool from Big Idea Design is mostly a trinket. It’s nice having a second option for opening packages and bottles, and on top of that the blade in it is a standard utility bade that’s replaceable. It’s well built being 2 pieces of titanium and disappears in my coin pocket. They make a slide version as well, but I copped the standard one for half price, and really couldn’t stomach 80USD for the slide.

Finally, we have the Sony WF-1000XM3. These are the best wireless earbuds I’ve tried so far, hands down. It took a while to find tips that fit for me, but the Symbio W in large are perfect. There will be a review of these at some point. I’ll try the Pixel Buds when they release due to the case size, but I have a feeling the noise cancelling of the Sony’s will keep me in that camp.

GTX 1660 Super: The Story of Modern Warfare and Confusing Naming.

Alright, it’s been a little while since I’ve played a video game. The last one I played with any kind of seriousness would have been Battlefield 4. I jumped into stuff here or there like the Mass Effect titles, but ultimately, I was dormant when it came to PC gaming for a while. The GTX 970 was put to good use for accelerating Adobe products and whatnot, so not a total waste of course. Then the Call of Duty beta came out and I even though I played it very little, it felt very Call of Duty 4 – The one game that got me into the Call of Duty series and the game that really sparked the popularity of the series. So naturally I bought it.

EVGA GTX 1660 Super Ultra SC

EVGA GTX 1660 Super Ultra SC

Now, the GTX 970 isn’t a bad card still. It’s a very capable 1080p gaming card, even with more modern titles if you’re willing to take your settings down a few notches. That’s great and all, except I bought into 1440p monitors forever ago. So, Call of Duty ended up running at 75% resolution scaling, the equivalent of medium settings, with Nvidia’s sharpening filter applied. Now it didn’t look exactly potato, mind you, and I was consistently hitting my 60FPS target, but this game looks amazing at full graphics settings. So off I went looking for a video card upgrade. Which is where I discovered in my time away from hardware, that Nvidia must have started smoking something. I shortlisted the GTX 1660 Super, the GTX 1660 Ti, and the RTX 2060. These cards seemed like the best options in the price range I set.

I quickly ruled out the RTX 2060. The price bump with in the 100-140 dollar range, and although it has a general 20% boost over the other two cards, there was no way I was taking advantage of it’s ray tracing functionality at 1440p with both the card and the rest of my hardware. After looking at benchmarks and telling myself to get over scope-creep and think logically, I ended up with the GTX 1660 Super.

Nvidia released the GTX 1660 and the GTX 1660 Ti earlier this year. The 1660 has a slightly cut down core count and GDDR5 vs the GTX 1660 Ti’s higher core count and faster GDDR6 memory. I can only assume that during some board meeting at Nvidia they decided “Hey guys, you know what would be great? Let’s invalidate the existence of these two cards and release something in between the two price points but keep selling ALL THREE.” Seems like a good idea. So along came the GTX 1660 Super, a GTX 1660 with even faster GDDR6 memory. It’s MSRP is 10 dollars more than the GTX 1660, and about 50 dollars LESS than the GTX 1660 Ti. It’ generally performs around 10% faster than the GTX 1660, and 2-3% slower than the GTX 1660 Ti. Alright, I’ll take it.

This new card is tiny!

This new card is tiny!

So how is it compared to the GTX 970? Well…

·         The GTX 1660 Super is somewhere between 70% and 100% faster than the GTX 970.

·         The GTX 1660 Super has a 20-watt lower TDP than the GTX 970.

·         The GTX 1660 Super tends to run cooler and quieter than the GTX 970 under load.

TL;DR – It’s better. Even considering this is an entry level product. Top that off with an Nvidia API supported auto overclocking feature, newer x264 hardware encoding for better quality screen capture, and a price point that’s $120 less than I paid for the GTX 970, I’m pretty pleased.  

I’m running into some bottleneck issues now of course with the rest of my aging hardware. This, however, is only relevant in games. It’s very rare I’d need to cut down on my filter times in Photoshop or my Lightroom processing, so it feels like the i5-4690k might be enough for the near future. The new Ryzen hardware is looking very attractive for the money, however.

Sony Released A 35MM F1.8 Full Frame Lens?

And I bought it. Goodbye 28mm F2, we hardly knew ye.

That sure looks AWFUL dandy.

That sure looks AWFUL dandy.

I’m really not sure why I didn’t enjoy the 28mm F2 so much. My favorite lens on Sony’s APS-C platform was easily the 20mm F2.8, even though most people had complaints about it. The 28mm F2 was better built, faster, and had a slightly wider focal length.

This is an 800 dollar 35mm f1.8 lens. That’s not cheap. That’s more expensive than the 28mm f2, and more expensive than the 85mm f1.8. Why did I buy it? Well I had a two month love affair with the Fuji X-Pro2 and it’s wonderful 23mm F2 lens, and I’ll be honest, I had a TON of fun shooting in Toronto with it. It’s a great camera. I was very tempted to keep it - It hit all the check boxes. Decent frame rate, reasonably fast focus, dual card slots, weather sealing, and it was discreet. It looked like an old rangefinder. Nobody cared.

I took a trip back home late summer. I was asked to take photos of my sister and her boyfriend again. And I took the Sony. And I’ll be honest, doing a “professional” shoot with that again made me remember why I liked this camera so much. I don’t really need to think. Files are clean. The AF is flawless. It hits shot after shot. There’s SO much data in the files. Look at below!

So. Much. Detail.

So. Much. Detail.

So, after shooting this, I quickly realized that I didn’t want a new camera. I wanted the 35mm focal length. Thankfully, Sony came to my rescue, because the Zeiss 35mm f2.8 wasn’t cutting it, neither was the Rokinon 35mm f2.8. Let’s not even get started about the baby’s arm sized Sigma 35mm f1.4, or the extremely pricey Zeiss 35mm f1.4.

I haven’t shot a lot with it yet, but my initial impressions are below:

  • Excellent build quality - Matches my 55mm Zeiss and 85mm Sony.

  • Love the addition of the focus hold button and the AF/MF switch.

  • Out of focus elements seem well rendered - Great, smooth bokeh.

  • AF speed seems to exceed the already very fast Zeiss 55.

  • Excellent close-focus capabilities.

  • About the same size as the 55mm Zeiss - Not a pancake, but still discreet vs a DSLR.

I feel my kit is pretty rounded now. 35, 55, 85, all f1.8, and for landscape work I have the 16-35 F4. I’m still looking to add a 70-200 equivalent, but I’m unsure if I want to drop money on the first party options, or wait for Tamron to help me out here. All roads are currently pointing to them releasing an affordable telephoto zoom. There’s always adapting too… Decisions.

New Batteries

New batteries are cool.

I should probably put more effort into the lighting…

I should probably put more effort into the lighting…

The smaller one is the Anker PowerCore 10000 PD. It does 18W power delivery and fits in my jacket pocket. It fast charges my phone. It recharges fast with the same cable and adapter I can use to charge my phone. The same cable that is used to charge it and my phone can charge my A7iii and Pixel Buds. That’s neat.

The bigger one is the Anker PowerCore+ 26800 PD. It does everything the above one does except it doesn’t fit in my pocket. But it’s really cool trick is it charges my Surface Pro. It lives in my backpack.

So to recap – All these batteries charge things and recharge themselves with Power Delivery. That means I only need one USB-C cable and one (30w) wall adapter to charge my batteries AND my devices. Add in a MicroUSB cable and we can cover the Kindle and the older headphones too. Goodnight, cable clutter. Hello, Power Delivery.

Wireless Hunt: The Return Of The Wireless Hunt – Google Pixel Buds

Hey, I live in Toronto now. That’s kind of cool. Toronto is loud. Public transit is loud. I spend almost an hour each day on public transit. The Sony WI-1000X in my last post have been absolutely amazing when it comes to eliminating the human and vehicle noises around me, but they’re big, at least when it comes to IEMs. Now this usually isn’t a big deal, but as I find myself in a city with things to do in a social setting, I’m finding myself travelling around without a bag to keep these things in. And, rather than walk around and advertise how nerdy I am by keeping the WI-1000X hanging around my neck, I casually pondered additional options. Not until this Friday was I so certain on what to do, however.

Queue Friday, heading downtown for… Social things. I wasn’t bringing a bag, just a jacket. I needed to travel quite light. The WI-1000X sat on the coffee table, but a quiet call from my desk drawer caught my attention. Wired pixel buds? Why not give them a go? I initially dismissed them as included garbage, but figured I’d be spending about an hour on a street car, I may as well have some form of entertainment. So, I plugged them in, and off I went. And I was surprised. Surprised enough to go out on Sunday and grab the wireless version.

DSC05377.jpg

I’ll be honest, these have been 50/50 on the reviews. I think it all comes down to usability and people’s expectations that these are going to compete with Apple’s Air Pods. And in a sense, they should. The price point is the same. They’re from a first party. They offer similar integration with their flagship device. But the Pixel Buds were generally slammed in reviews. The case was weird. The cable wasn’t ideal when the Air Pods were true wireless. The sound quality wasn’t there. Etc. I think though, as a first version, these things are great.

The Pixel Buds are an open ear bud solution with a 5-ish hour battery life, 24 hours-worth of charge in the case, and capacitive controls on the right ear bud. They feature quick pairing functionality and live translation functionality with Google Pixel phones.

Initial impressions were good! I was listening to the USB-C wired Pixel Buds on the trip to get these, and the wireless version actually sounds fuller. The packaging is as expected from Google – Clean and easy to get into. The package includes the headphones, the case, and a USB-A to USB-C charging cable. Being non-in-ear headphones, the fit is easy. Just adjust the nylon braided loops for fit, and the things don’t fall out. The pairing process was dead-simple. After a quick charge, I opened the case next to my Pixel 3 and was greeted with a prompt to pair the Pixel Buds. No fussing in menus, no pairing codes, nothing. Just tap “connect” on the dropdown. A couple customization screens, and it was off to the races. The capacitive controls work pretty well. Swipe left or right for volume controls, tap to play/pause, double-tap to skip to the next track, and hold the earbud to activate Assistant. No need to wait, just hold it and ask away, and you get an Assistant reply in your ear. So far so good.

How about sound quality? Not amazing. Not bad though. Coming from the Sony’s and Ety’s, I was shocked for an open, non-IEM design. They don’t have a lot of sub-bass, but the mids and highs are nice (This is coming from someone who used Ety’s and AKG 701s… That’s got to have SOME weight). They can get drowned out by louder noises, but the top volume is plenty for most usage. It’s almost like going from a sword in the Sony’s to a club in the Pixel Buds, but I kind of like it.

So, in the end, what do they do good for a tech-nerd like me? How about a list:

  • Compact! Great size for throwing in a jacket pocket.

  • Battery life is amazing for the size. 5 hours on the headset and 24 hours on the case sets me up for about 2 weeks or more of transit and day-to-day use.

  • Intuitive and minimalist controls make navigating the headset easy.

  • Pairing process was no-nonsense.

  • Bluetooth 4.2 with multi-point connect. Sony, why don’t you have this? You’d be so much better with multi-point connect.

  • USB-C charging. I didn’t mention it. But almost everything I own for mobile now charges USB-C. I have the Surface USB-C adapter for the Surface, the Pixel 3, my Sony A7iii, and now the Pixel Buds. In a worst-case scenario, I can connect my Pixel Buds case to the Pixel 3 for a quick top-up, and it’s one less cable I need to tote around, although I carry Micro USB for my Kindle.

  • Open is nice for an office environment – I can listen at low volumes, but still be aware of those calling my name around me.

How about my wish list?

  • Better isolation. Seriously, the open design is nice that I can hear announcements and cars that might possibly hit me, but sometimes you want to drown out the surroundings.

  • Active noise cancelling. See above. I believe Google’s AI tech could be leveraged to improve Sony’s ambient aware tech. Think about storing announcements for later listening, or hearing what’s only relevant to your transit situation all while drowning out the crowd.

Overall, not bad for a first attempt, Google. These slim down my carry and still let me have decent quality music when I’m travelling to and from places. I’m cautiously awaiting the version two, and hoping you make something even cooler. No need for true wireless, just make things more awesome.

Streamlining Storage

2018 came and went, and my reliance on cloud-based services increased. It’s not at all a bad thing. Services like Adobe’s Creative Cloud, Amazon Prime’s unlimited photo backup, One Drive, and Google Drive have changed the way I work. Streaming services like Google Play Music, Google Play Movies, and Netflix mean I don’t care much for locally stored media anymore. Hell, with data portability, it doesn’t even matter much what computer I’m working on. My primary computing device for the past month has been a Surface Pro 2017 – The exact same Surface Pro that got me through 5 weeks split between Ontario and Iceland last year. Yes, I missed the extra processing grunt, storage space, and RAM, but I didn’t miss my software environment – I had that with me, for the most part.

streamlinintechimage.jpg

The only thing I’m feeling that I’m struggling with is portability of the only media I like to keep locally – My RAW files. I detailed my process for keeping local backups of my RAWs in my previous blog post, and I’m going to need to keep doing that. I do however want to eliminate the file server from the equation. With no other locally stored media, and all my RAW files already backed up to Amazon Photos, drive redundancy is just a nice thing to have. Sitting on a network share means I’m really not getting much performance increase out of having a RAID10 equivalence setup. It feels pretty poor having a setup that can hit almost 800mbps read and 400mbps write at max but be speed limited to a single gigabit ethernet connection. I could setup NIC teaming, but I really want to cut down on space taken up physically as well.

I’m looking at a few options, some being a bit more expensive than others. We’ll start with the cheapest and go from there.

Option 1: The cheapest

8TB external hard drives are surprisingly a lot cheaper than bare drives. I now understand after looking at prices why people buy these and shuck them instead of just buying bare drives. Makes sense from a cost perspective. An 8TB Seagate Backup Plus Hub offers a 2 USB3.0 port hub on the front of it, and a USB3.0 connection to the computer. Read and write performance per reviews is close to a bare drive connected internally. The one disadvantage here is it’s another device (although much smaller than the file server) that takes up space on a desk. The other disadvantage is expansion. The only real option is to get a larger drive and migrate the data or plug in a second drive. 8TB is a lot of photos however, with my current crop estimated at under 600GB.

Option 2: The middle ground

I could spend a bit extra and grab an 8TB internal drive. I’ve got a lot more selection available to me – Different drive speeds and warranty options most importantly. Expansion is possible by adding additional drives. It’s more streamlined as it’s internal, but it also reduces airflow in my already airflow optimized machine as I’d have to add the drive cages back in. There’s also the noise thing. My computer is also noise optimized – As detailed in previous posts on the build, it’s essentially silent. All fans either don’t spin or default at the very minimum rotation speeds, and all storage is currently solid state. Even quiet hard drives make some noise, though I doubt I’d be able to hear them over the mild buzz my monitors make.

Option 3: Gucci

This one is a bit over the top, but with the falling prices of flash memory it feels like it makes a bit of sense to grab a 2TB M.2 SSD and use that as my photos drive. It’s CONSIDERABLY faster than any hard drive with reads and writes in the vicinity of 500mbps, access times are instantaneous, and it’s dead silent. I also don’t need to add drive cages back in. The only issue is it’s only 2TB of space. With my current usage, and the possibilities of me shooting more, it’s likely I could exceed that within a year or so. Expanding is still fine as I can add more internal drives, but drive cages would have to go in, etc. Not exactly the best situation.

Weighing the options

As of now I’m leaning toward the cheapest option. It’s very unlikely I’m going to exceed 8TB of storage space in a few years, and by the time I’m looking to expand beyond that it’s very likely the storage environment would have changed considerably. As is now it should also offer better performance than my networked solution. If the single drive fails, I just warranty or replace it, and download the lost data from Amazon. I won’t lose any work either thanks to my workflow in Creative Cloud – I’m hoping to keep 6 months to a year worth of work on Adobe’s cloud storage, so would only struggle if I needed to go back past that.


My Creative Cloud Workflow – Migrating to Lightroom CC, Sort Of.

The Creative Cloud ecosystem is powerful, and I’m confident I’ve finally wrapped my head around a way to keep things easy to ingest on any device, yet continuously backed up, with only a single import. To preface, I’ve been using Lightroom for a bit now, with my primary workhorse being Lightroom Classic. I still can’t get rid of classic as it offers a lot of features I still use that aren’t available in the CC app. The CC app continues to get better and better every month, I hope to one day move over entirely. Until then, here’s how it works.

“The Cloud" at work.

“The Cloud" at work.

The ingest point – Lightroom CC

I have 1TB of creative cloud storage. This offers me a pretty massive working library at any time, and ingesting into Lightroom CC, whether it be on my phone, my Surface, or my desktop, means I get RAW files available on all other Lightroom CC installs. Easy, right? It doesn’t matter where I am or what device I have, I can always start uploading and editing as soon as I’m done shooting. Backups are safe (provided there’s an internet connection) so I have no need to worry about lost files. For mission critical stuff, there’s a lot of redundancy here – Dual SD cards in the camera, cloud backup with Lightroom Creative Cloud, my Western Digital My Passport Pro Wireless, etc. The only issue here is there’s limited space with the 1TB that Adobe offers at the 20 dollar a month price point, and once you delete a photo from the CC app, it’s gone from the cloud and all other devices. How do I work around this?

Lightroom Classic – The backup

Lightroom Classic is still used! I keep my Classic library running and set it to sync with Lightroom Creative Cloud. My data lives on my NAS, and I keep the subfolder format set to how I had my library prior to using the cloud functionality – It’s pretty seamless.  Any files uploaded to Creative Cloud are downloaded into my Classic library, show up in my normal folder structure, and reflect any changes made to the images across devices. The neat part is, that whenever an image is deleted on a Creative Cloud app, it doesn’t delete the local copy from Classic!

Bringing it all together

Think of Creative Cloud storage as a scratch drive of sorts. Anything you’re currently working with is stored there. Once you’re done with a project and everything is showing up on your backup (Lightroom Classic), delete it in a Creative Cloud app. This frees up your cloud storage and local device space while also providing you with a backup. Here’s an example of how things work: I finish a shoot somewhere. Immediately I start ingesting photos on my Surface Pro into Lightroom CC, and flagging/rating photos. As these photos are uploading, they’re downloading to my running Lightroom Classic on my desktop at home, along with any changes/flags/ratings made to the images. Since I have a large working space with the 1TB of Creative Cloud storage, I can just run off that for a bit. When I get home and verify backups of all files are done, I can remove all but my working picks from Lightroom CC on any of my devices, which deletes them from the cloud. They’ll all remain backed up on Classic though, just in case! From here, I just keep editing on whatever device I’m on – be it my Surface Pro, Pixel 3, or desktop, with all changes syncing between seamlessly.

The future

I love the idea of being “digitally nomadic” and not really tied to any specific device. Creative Cloud enables that for me, but the issue is still the offline backups and ensuring my data is retained. I’m tied into Classic right now for that, and honestly, it’s working alright. Classic is still required for several things – For instance it does HDR and panoramas which don’t exist in Lightroom CC yet, and the print and export modules are very robust which I think is a necessity when you’re ordering prints or ensuring best quality for web exports. Until those are in Lightroom CC Classic will continue to be a thing.


Moving to SquareSpace!

Oh, and I guess I migrated the domain to Google Domains as well. Not too shabby for an afternoon!

For the past year or more I was on Adobe’s MyPortfolio. It’s nice, but limited. There was no blogging platform, so to keep it free, I tied in a blogspot blog, but even with that the customization and features seemed a bit limited. After enough sitting with a split platform and seeing enough advertisements for SquareSpace, I figured I’d give it a try. It’s been just past the 14 days and I’ve decided to plop down the cash for a year.

The overall interface is very easy to use and configure, the blogging platform seems fairly full featured, and all of the integrations are great. The option alone to import everything from my blogspot site into SquareSpace without issue blew my mind. I may still give NameCheap’s new EasyWP a go, but I’m really after an all in one website/blogging platform that looks nice and is easy to put together. SquareSpace hits those marks.

Bonus points to their integration with Google Domains - I was able to setup the DNS entries without touching anything - A quick login to my Google account through SquareSpace’s interface was really all it took. I’ve yet to setup GSuite, but 5 dollars a month for a domain email account would be pretty swell. For now, I’ll deal with the forwarding options available to me through them.

Wireless Hunt: Probably Over – Sony WI-1000X


Well that sure didn’t take very long. As discussed previously in my HD1 Free post, the Pixel 3 is USB-C only. The headphone jack is dead, long live the headphone jack! I was battered and beaten by the Senn’s being absolute hot garbage, but I soldiered on. My hallmarks of (mostly) affordable audio quality – Etymotic – set a very high bar, and for me are an absolutely perfect sound signature. The only closest ‘phones I’ve found is in the full size AKG K701s and oddly enough the Apple dual driver IEMs (Long live you, you affordable, glorious bastards), but then again I haven’t looked extremely hard. I love clarity, I love a prominent midrange, I love what most would call “anemic” bass. For me, detail is king. I want to be wowed by accuracy, speed, and finesse, not by bass so hard it loosens my molars and obliterates the mids and highs. But, then there’s the Sony WI-1000X, and maybe, just maybe, I can find a middle ground.

WI-1000X

The WI-1000X are a neckband style Bluetooth IEM with a very premium build of metal and rubber covered plastic with a padded leather neckband weighing in at a featherlight 70-ish grams. They feature a 10-hour battery life and active noise cancellation on the pair of hybrid drivers. High tech!


Initial impressions were good! I got mine used (Only about a week, practically new!) at less than half retail cost, and they arrived without any retail packaging, but did sport the charging cable, headphone cable, carrying case, and full arsenal of both silicone and triple comfort tips. Out of the bag, I got a pretty much perfect fit with just the included large tips. Isolation was mediocre as expected with a shallow fit canal phone, but I knew this going in. I immediately threw on noise cancellation, and outside of a faint buzzing noise, outside noise was cut to the point of about my Etymotics.

Accessories! Travel bag, MicroUSB to headphone, airplane adapter, microUSB cable, and a full arsenal of tips.

Sound quality wise, I will say they’re not Etymotic, but they’re good. Streaming Sony’s LDAC codec off my Pixel 3 gave me what I could call a pretty full, enthusiastic, yet smooth sound. I do still find the low end just a bit sloppy, but then again, I’m not used to having a dynamic driver in my ear. The hybrid design leads to a pretty wicked experience though, with all the boom of a dynamic driver and the articulation and speed of a balanced armature. A-Ha’s “Take on me” has the synth perfectly placed and articulated over the bass line, with the vocals not getting lost in the mix. Kygo’s “Here for you” sees Ella’s vocals smooth as ever, and nothing ever really gets lost or jumbled in the mids of “Mr Brightside” by The Killers. They trade the Etymotic’s intimacy for an improved soundstage, as seen in Robin Thicke’s “Blurred Lines”, which I find plays well on soundstage in general. They’re warmer, smoother, and less precise than Etymotic, but they’re enjoyable!

There’re a few things I’m a bit annoyed by, but they’re minor at most and not at all make or break for these things.   
  • The stock tips fit great, but don’t isolate well. I was able to work around this a bit by placing some comply foam between the tube and hood on the large hybrid tips, which both improved comfort and fit, and increased isolation. 
  • The IEMs also take well to EQ, however the Sony app on Android limits you to the SBC codec when using the EQ in the app – Too bad. 
  • When powering the IEMs on, they default to noise cancelling as well. I notice a bit of a change in sound with noise cancelling, and it’s only two taps on the right neck button to change it, but it would be nice if it remembered your last setting. 
  • The charge port on them is MicroUSB and you can’t charge and listen at the same time. 
  • They’re on Bluetooth 4.1 with no multipoint connection. It’d be nice to be able to switch quickly between say, my Surface Pro and my Pixel 3, but you need to manually disconnect from the last device before connecting to another.

Overall these are a tech nerd’s dream Bluetooth IEMs and I’m pretty darn happy with them. They’re packed with sweet features like ambient passthrough, they noise cancel, they sound great, have better battery life than true wireless, and they’re built well. I’m happy with these, and if I had a wish list for Sony’s next version, it’d include a couple cool things like Bluetooth 5.0 with multipoint connection, USB-C with fast charge, improved battery life, and  settings memory when powering off!